Step by Step Membuat Simple Augmented Reality Berbasis Android Menggunakan Unity 5.1.1 dan Vuforia 5.0.5
Halo sobat blogger.. Sudah lama tidak update artikel. Kali ini saya akan
membahas tutorial membuat aplikasi Augmented Reality di Android
menggunakan Unity 5 dan Vuforia 5. Sebenernya ini bukan hal yang baru di
blog ini, sebelumnya saya sudah membuat artikel semacam ini di
sini.Tapi karena cepatnya update dari Vuforia dan Unity alhasil saat ini
banyak sekali yang bingung mengikuti tutorial saya karena sudah tidak
relevan lagi. Karena banyaknya pertanyaan dan request maka kali ini saya
bahas tentang cara membuat aplikasi Augmented Reality berbasis Android
menggunakan Unity 5 dan Vuforia 5.
Ok langsung aja berikut adalah alat dan bahan :
Unity, dalam tutorial kali ini saya menggunakan Unity 5.1.1f1.
Vuforia SDK, dalam tutorial ini saya menggunakan vuforia-unity-5-0-5. .
Android SDK, ini adalah tools wajib untuk membuat aplikasi android.
Langsung saja kita masuk ke tutorial. Namun sebelum masuk ke tutorial
Anda dapat mendownload projectnya terlebih dahulu pada link di bawah.
Langkah 1 : Buka Unity dan buat project baru
Blank project unity
Langkah 2 : Ubah project ke Android
Ubah project unity ke android
Jangan lupa untuk melakukan pengaturan pada player setting
Pengaturan player
Atur nama company dan nama aplikasi
Atur nama company dan nama aplikasi
Dan juga pengaturan bundle identifier
Atur bundle Identifier
Langkah 3 : Import Vuforia SDK dengan double klik
Double click Vuforia SDK
Centang semua elemen import
Centang semua untuk import Vuforia SDK
Langkah 4 : Masukkan ARCamera dan ImageTarget ke dalam scene, delete Main Camera.
Masukkan ARCamera dan ImageTarget ke dalam scene
Vuforia mensuport debugging di PC menggunakan camera webcam. Tapi jika
hardware belum di support Vuforia Anda dapat menonaktifkan fitur ini.
Disable 'Don't use play mode' jika error
Jangan lupa save scene dengan Ctrl + S setiap melakukan perubahan untuk menghindari hal yang tidak diinginkan
Langkah 5 : Definisikan marker dengan klik ImageTarget kemudian klik 'No targets defined. Press here for target creation !'
Definisikan marker untuk target
Anda akan diarahkan ke website Vuforia. Login untuk masuk ke akun Anda.
Pertama klik 'Add License Key' pada 'License Manager' untuk membuat
lisensi. Lisensi ini nantinya berkaitan dengan harga yang harus Anda
bayar. Tenang saja, untuk tutorial kali ini Anda dapat menggunakan
license free.
License manager pada Vuforia
Pada lisensi ada kode yang harus Anda letakkan di code Anda. Copy semua
kode tadi kemudian masukkan di ARCamera pada project Anda
Lisensi Vuforia
Masukkan ke ARCamera
Masukkan license ke ARCamera
Kemudian definisikan marker pada image target. Pada bagian 'Target Manager' klik 'Add Database'.
Tambahkan database
Masukkan nama database, kemudian upload marker. Marker yang Anda Upload akan ditampilkan dan diberi rating
Marker yang di upload di Vuforia
Kali ini saya menggunakan marker berikut, Anda dapat menggunakan marker lain.
Meta have been in the news recently after a much anticipated
TED talk last week showcasing their next augmented reality headset, the
Meta 2. This was fantastic timing for my first article on developing for
the Meta augmented reality headset in Unity! If you have one of the
original Meta headsets and you’ve been putting off building AR apps —
now is a good time to dust that headset off and do some development!
In this tutorial, we will look at creating an augmented reality
butterfly experience. We will be starting from the basics and will
finish with a simple butterfly we can grab and move around our scene.
What You’ll Need
In order to follow along with this tutorial, you will need the following:
A Meta 1 Developer Kit – These are sold out, so if
you aren’t lucky enough to have one, you’ll need to find a friend who
owns one or wait for the Meta 2!
Unity 5.2.1 (32 bit) or Unity 5.2.2 (64 bit) – Meta
support for Unity 4 is ending soon, so it is best to get up to Unity 5
by this point! I’d recommend downloading via Meta’s links which we’ll
cover below.
Windows 8.1 or Windows 10 – Sadly Mac OSX isn’t supported and Windows 7 support is being phased out.
Downloading Unity and the Meta SDK
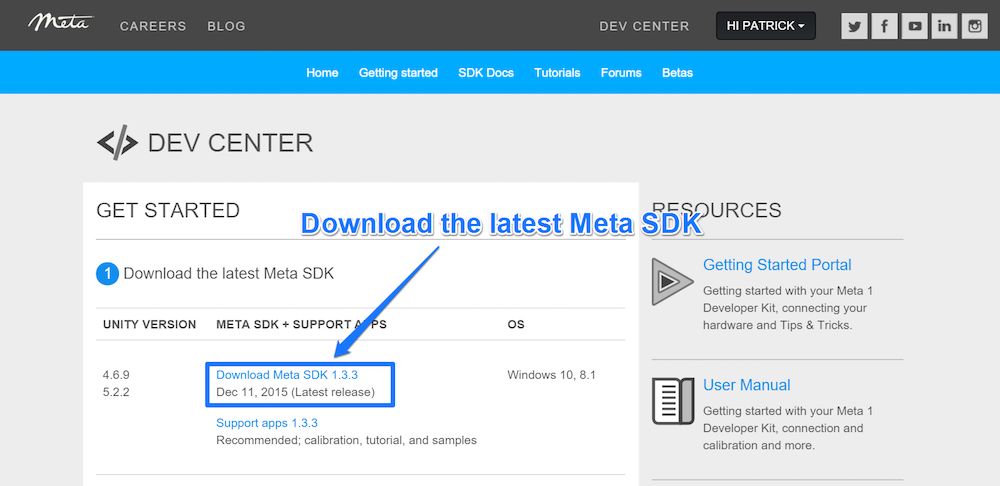
The safest way to get the right versions of both Unity and the Meta SDK is to head to the Meta Dev Center. From here, you can download the latest Meta SDK:
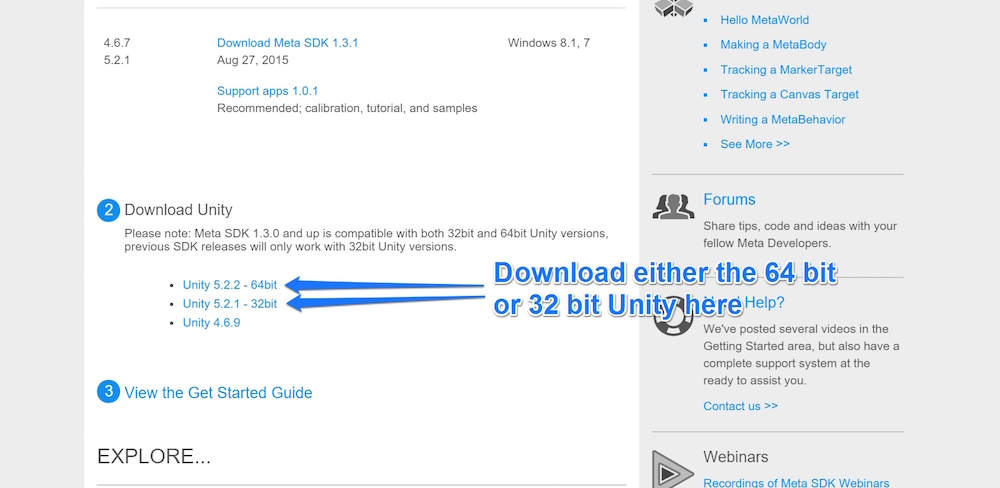
Once that has downloaded (or do this simultaneously if you’ve got
much faster Internet than I do!), scroll down to download either the 64
bit or 32 bit Unity depending on your operating system:
Once Unity has downloaded, run through the install process for both
the Meta SDK and Unity. Both are pretty straightforward, so I won’t
waste time discussing them here! Once both have installed, open up Unity
and we will get started!
Creating Our First Project
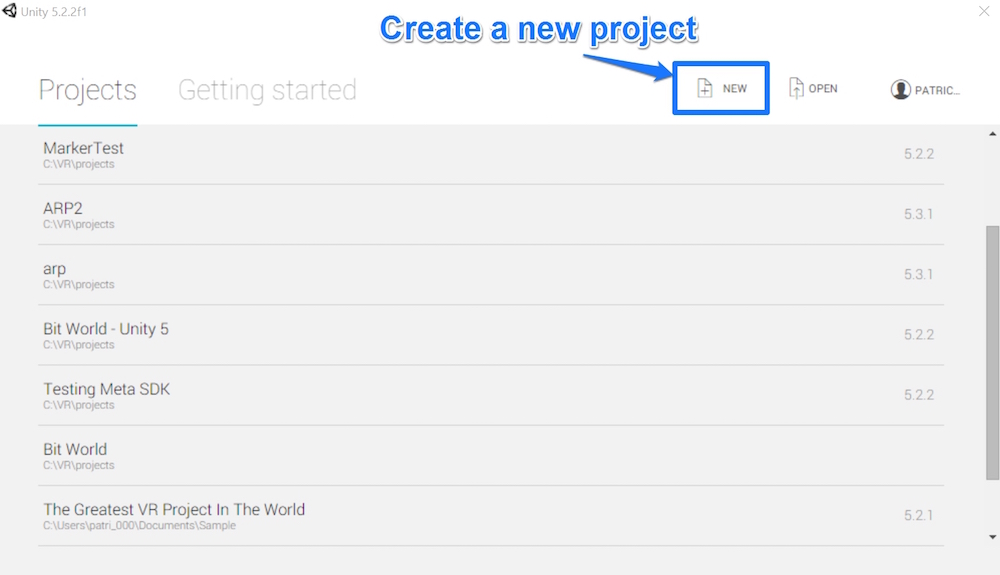
When we first open up Unity, the welcome screen has an option for
starting a new project in the top right. Click “New” to start a new
project:
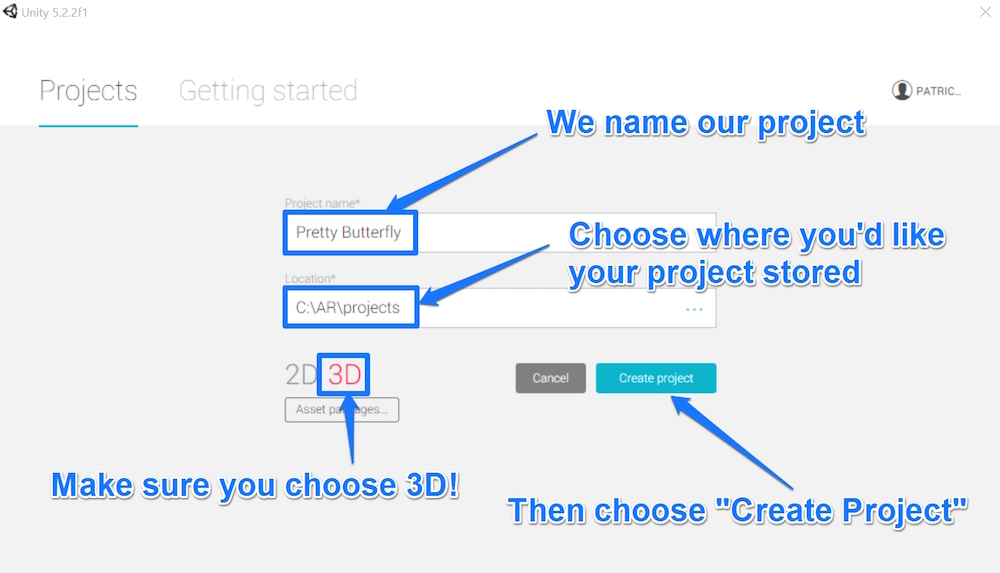
Then, we name our project (you can call yours whatever you’d prefer,
we’ve gone with “Pretty Butterfly”) and choose where you’d like it saved
on your computer. Make sure you have 3D chosen on the bottom left! When ready, click “Create Project”:
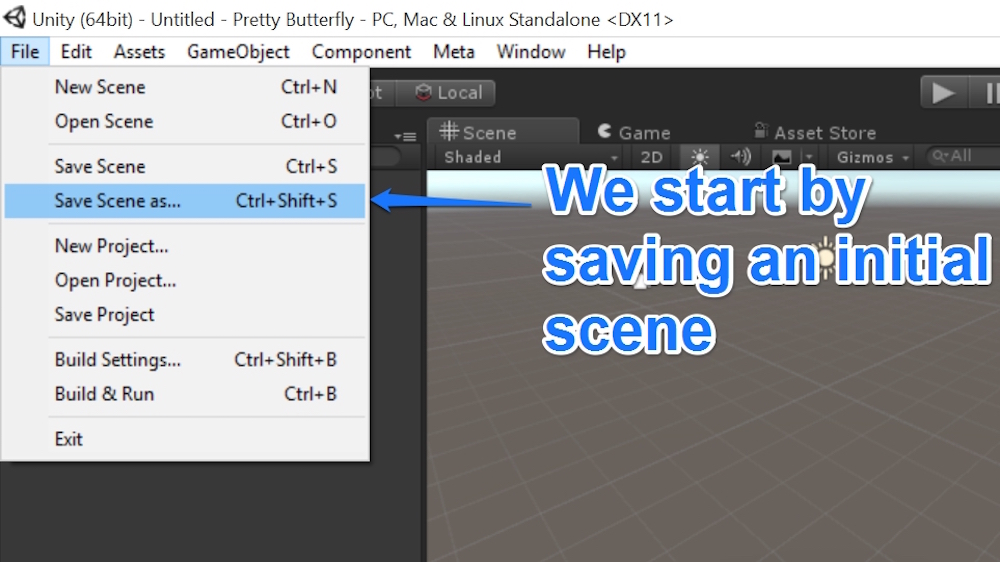
Before doing anything else, it can be a good idea to have your initial scene named and saved. To do so, go to File > Save Scene as….
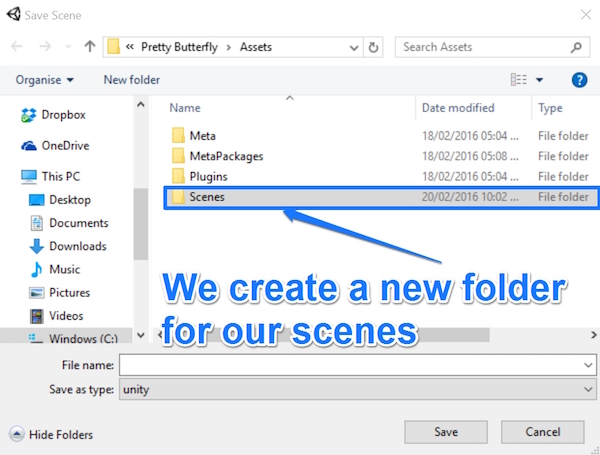
We add a new folder for our scenes within the project’s “Assets” folder called “Scenes”:
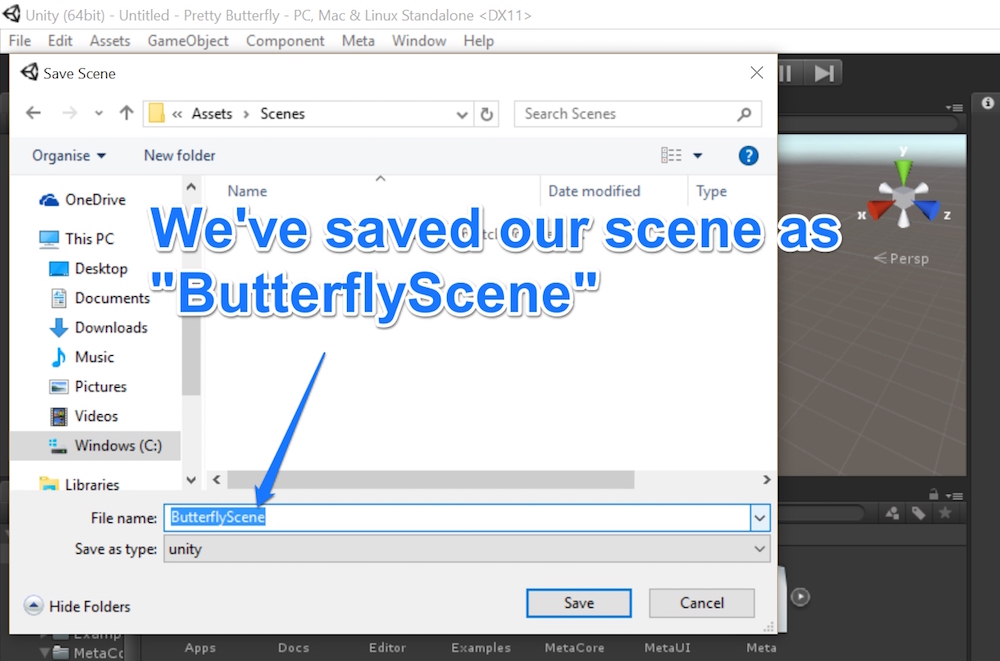
Then name our scene “ButterflyScene” — you can name yours whatever you’d like!
Importing the Meta SDK
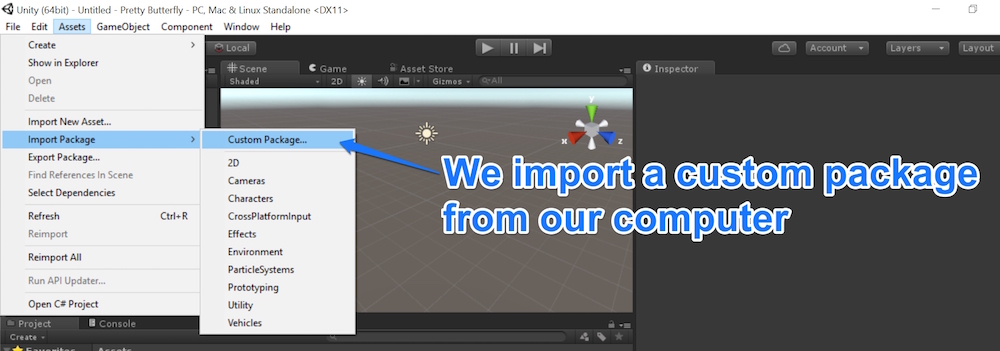
Now that we have a scene saved and ready, it is time to import in the Meta SDK we downloaded earlier. To do this, we click Assets > Import Package > Custom Package…:
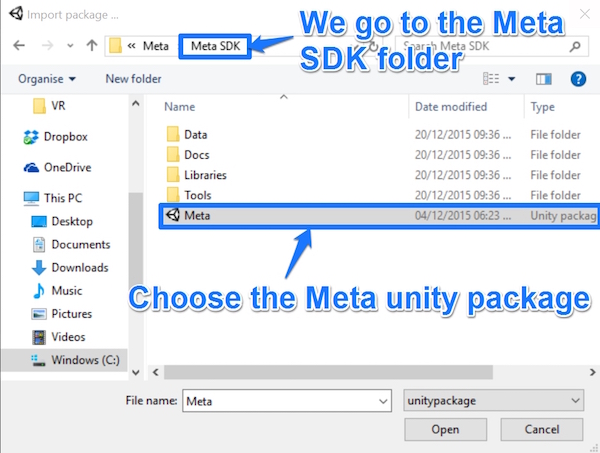
Navigate through your filesystem to the Meta SDK. For me, this was in C:/Program Files (x86)/Meta/Meta SDK. In this folder, we choose the “Meta” Unity package:
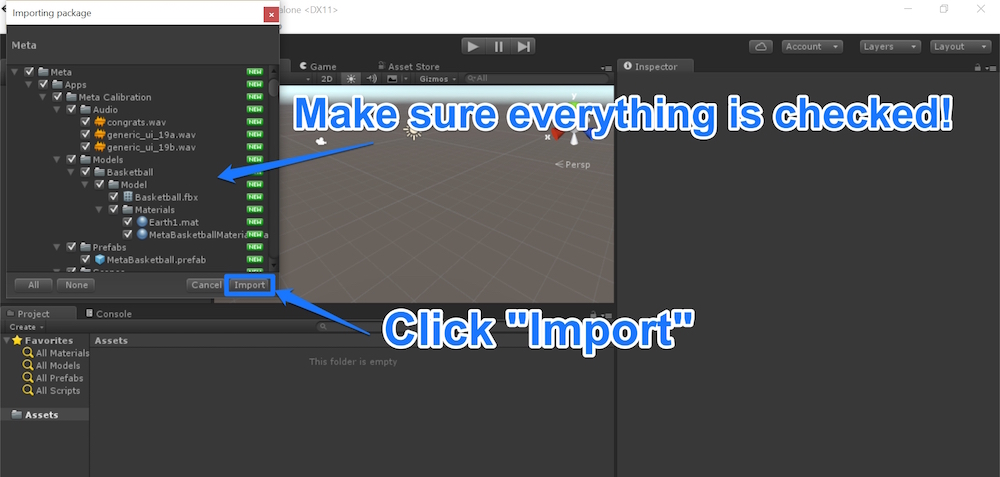
After a bit of loading time, a window with all of the Meta SDK assets
found will appear. Ensure everything is checked and click “Import”:
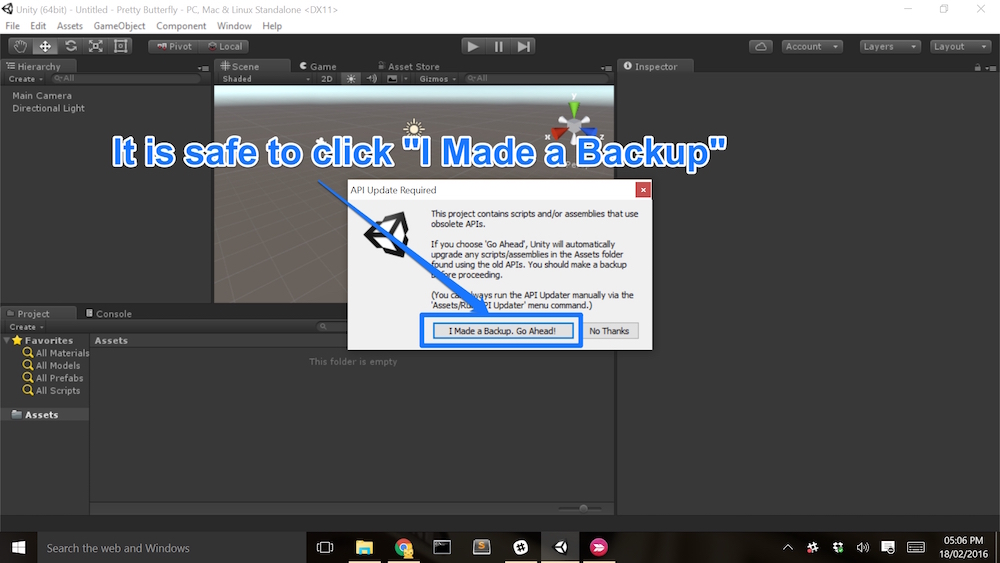
If Unity pops up saying “This project contains scripts and/or
assemblies that use obsolete APIs”, that’s okay. Just click “I Made a
Backup. Go Ahead!”
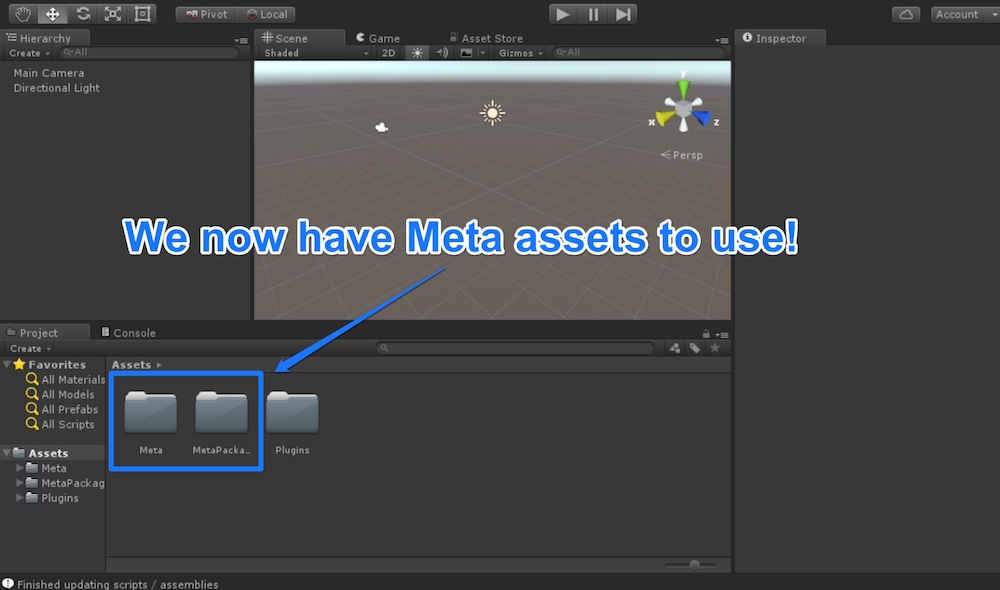
We should now see two new folders, “Meta” and “MetaPackage”, within our project:
Adding MetaWorld Into Our Project
Within our new assets, we have our “MetaWorld” Prefab that will give
us all of the Meta camera and interaction functionality we need. If you
are new to Unity — Prefabs are basically like template objects that can
be reused in multiple projects and scenes to share functionality.
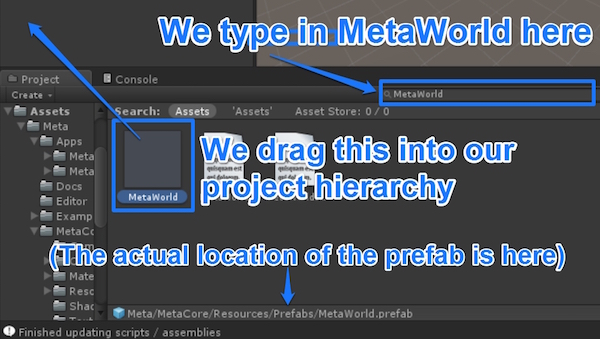
The easiest way to add this into our scene is to search within the
“Project” window. Type in “MetaWorld” and it should filter our assets to
show us what we want. Drag the “MetaWorld” prefab into your project
hierarchy (where you’ve currently got a “Main Camera” and “Directional
Light”):
The actual location of the “MetaWorld” prefab for those wondering is Meta/MetaCore/Resources/Prefabs/MetaWorld.prefab.
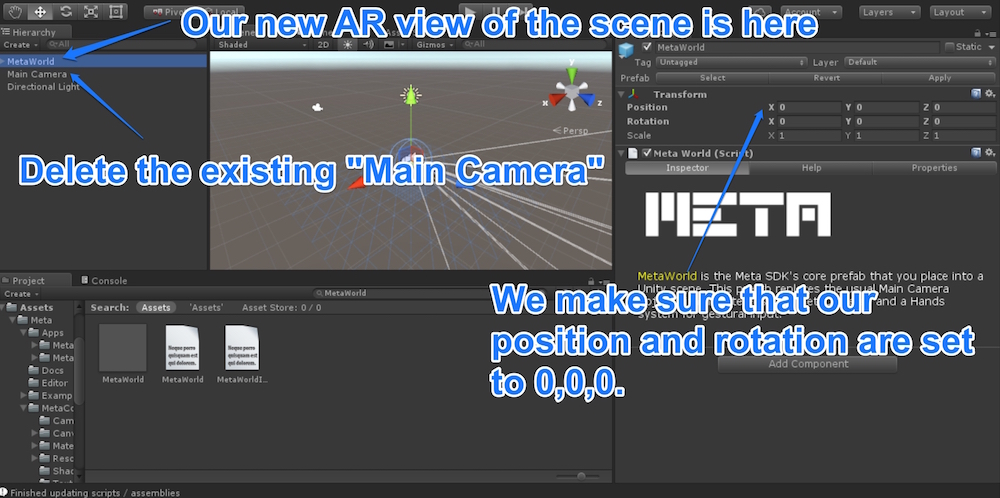
The “MetaWorld” object is our augmented reality view of the scene and
represents our Meta headset. Make sure it is positioned at {0, 0, 0}
and has no rotation on it. This is our camera view, so we can delete the
existing “Main Camera”. We can also delete the “Directional Light”:
Adding Our Butterfly
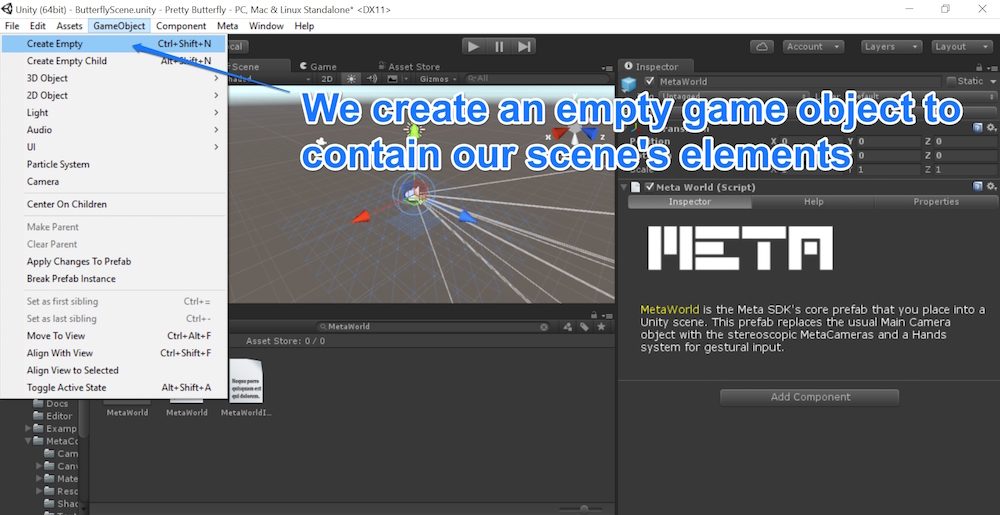
The cleanest way to organise our scene is to create a new empty game
object which will include the rest of our elements. For those new to
Unity, this creates a nice and simple container for our objects. To do
so, go to GameObject > Create Empty.
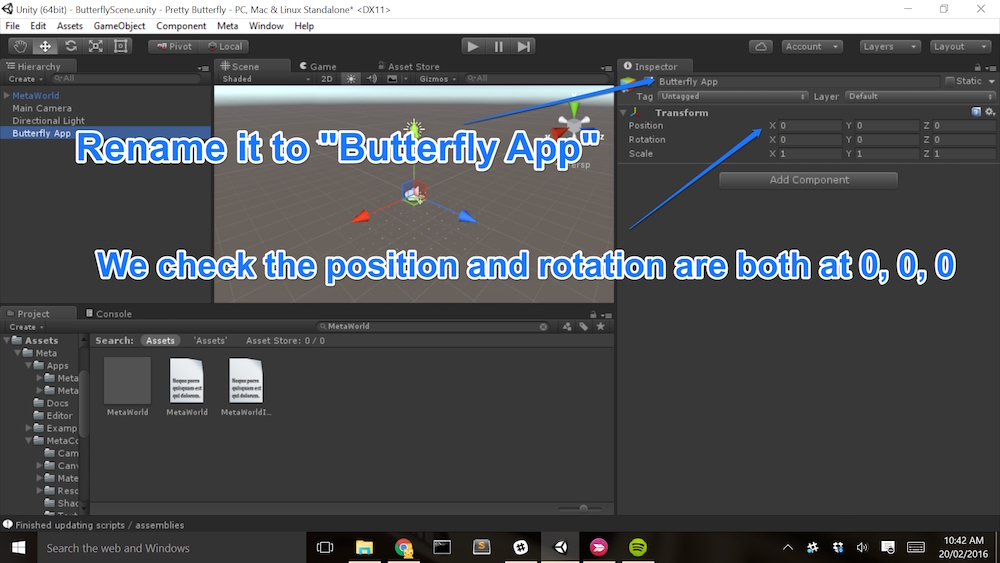
We rename this object to “Butterfly App” and ensure that it is
positioned at {0, 0, 0} with no rotation. This is important as all
objects placed within this will use the parent object’s position as a
base.
To get a pretty butterfly model to use, we will visit the Unity Asset
Store. If you’re not a fan of butterflies (unlikely, but you never
know!), you could download almost any model for this to work. Experiment
away!
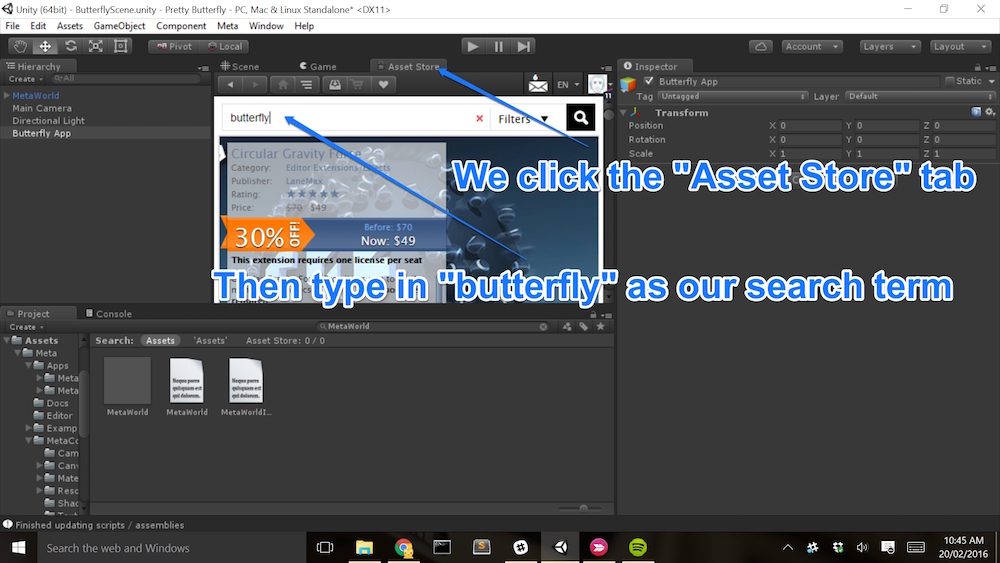
We will click on the “Asset Store” tab, next to our “Scene” and “Game” tabs, then type in “butterfly” in the search box:
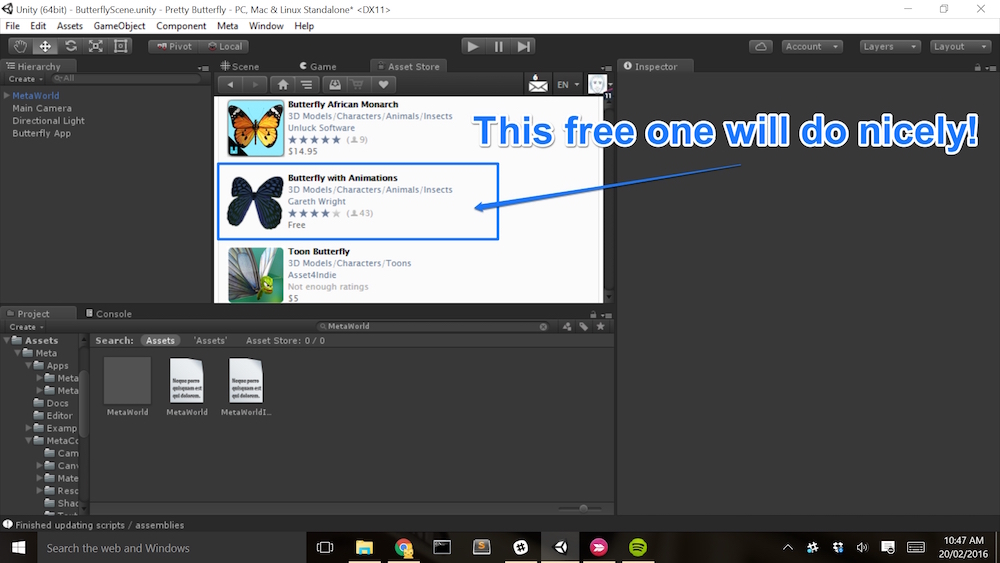
If we scroll a little bit, we will find a nice free one that will work perfectly for our demo:
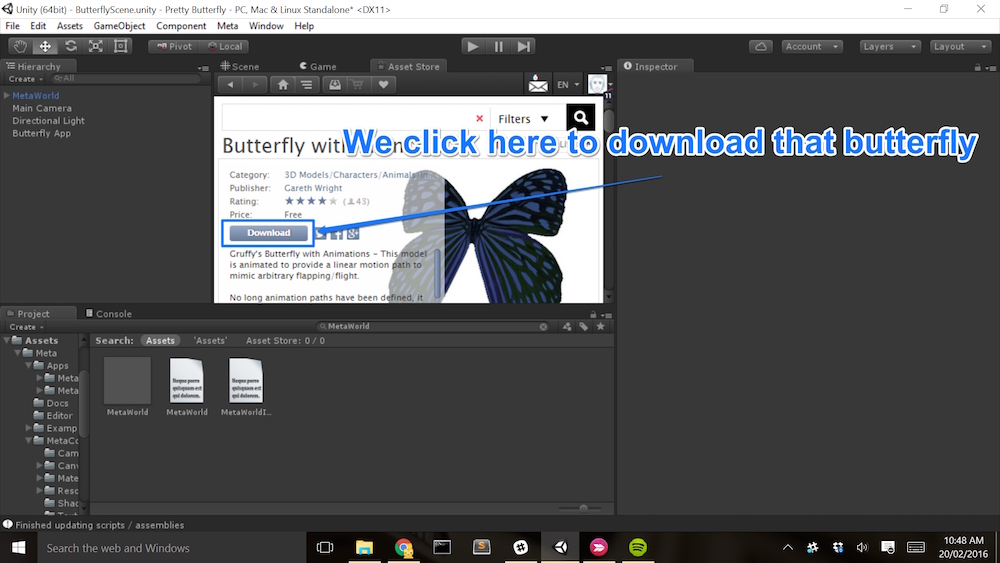
Click “Download” to begin downloading the files for our butterfly:
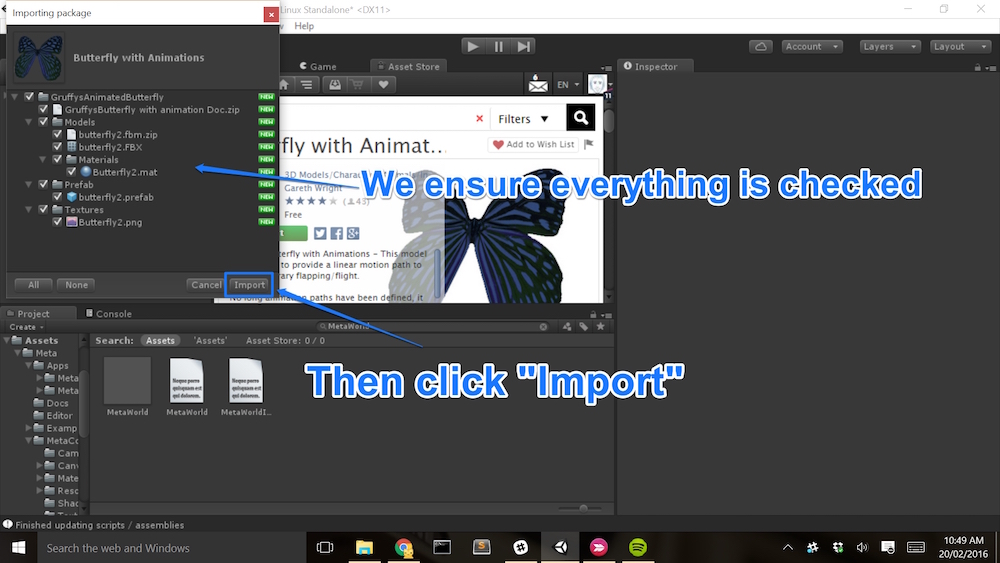
In the import window that appears, ensure everything is checked (just
as we did when importing in the Meta SDK) and click “Import”:
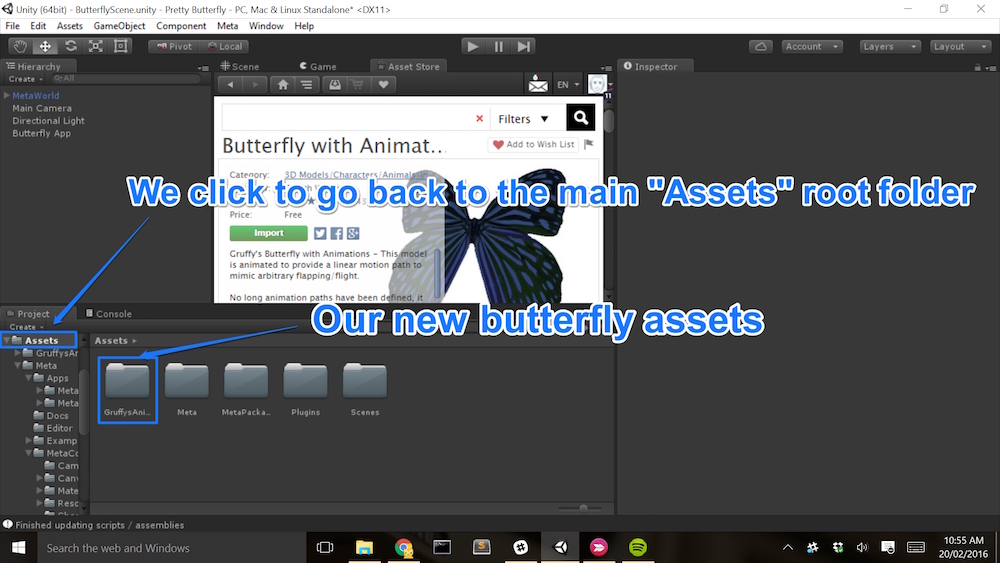
If we go back to the root of our “Assets” folder, we can now see a new folder with our new butterfly assets!
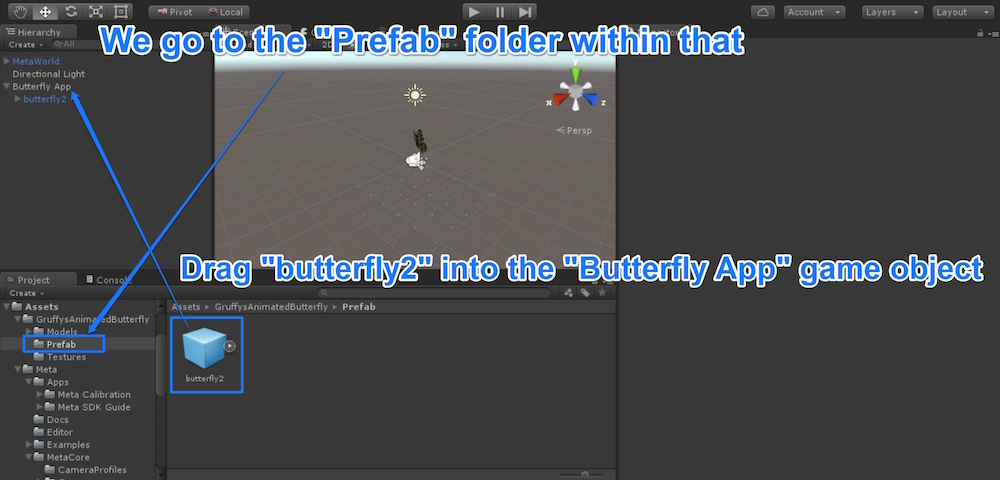
Within this new folder, we navigate to Assets > GruffysAnimatedButterfly > Prefab. We now drag the “butterfly2” prefab into our “Butterfly App” empty game object.
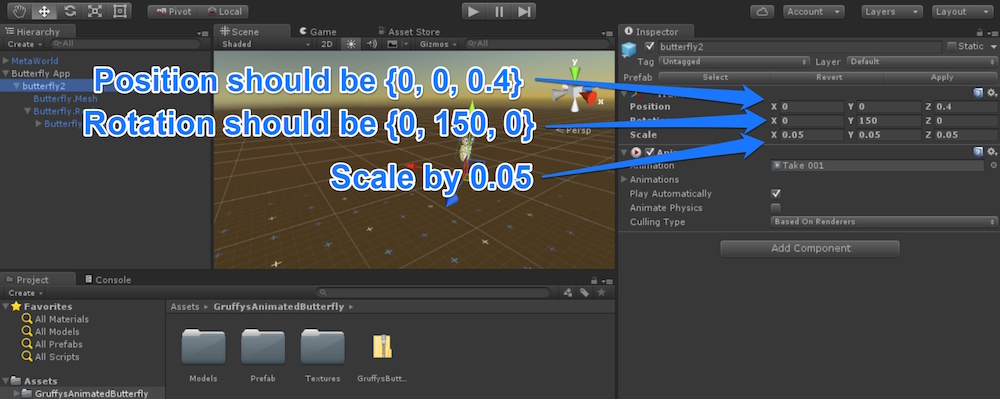
You can play around with the positioning of the butterfly if you’d
like. The best position I found was to have position Z moved away from
the camera by 0.4, but X and Y remain at 0. I’ve rotated the butterfly
on the Y axis by 150 and scaled it on all axes by 0.05. The scale can
definitely be whatever you’d like, if you’d like a bigger butterfly,
feel free to enlarge it (but you may need to move it back a bit more on
the Z axis to see it properly if you go too big!).
If you haven’t already, remove the “Directional Light” that came with the Unity scene — we won’t need it.
Giving Our Butterfly Meta Capabilities
In order to be able to pick up and move our butterfly around the
scene, we need the butterfly itself to be a “MetaBody”. This is a
component which comes with the Meta SDK and is simple to add to any
object in Unity.
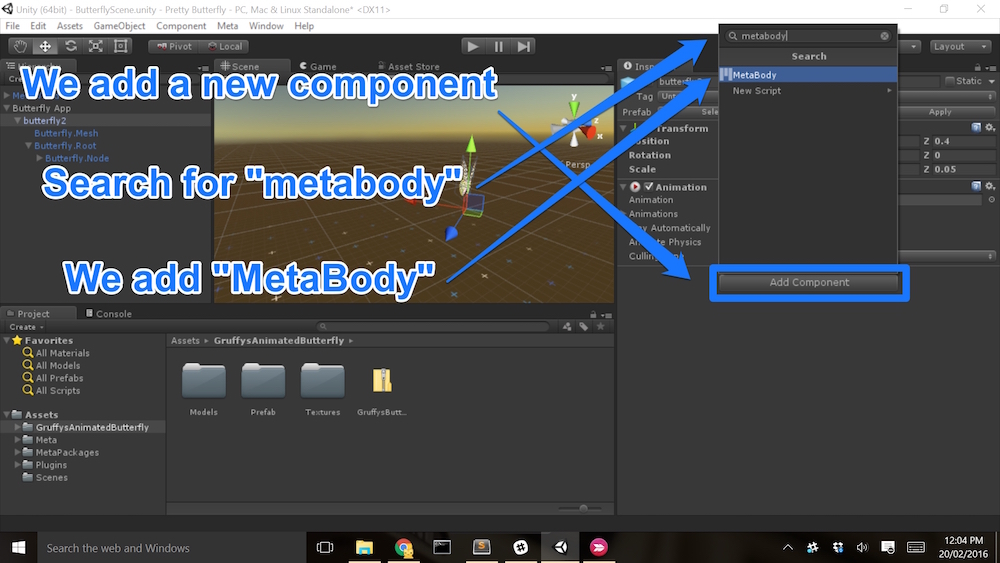
To turn any Unity object into a MetaBody-enabled object, click on the
object (e.g. our “butterfly2” in this case), click “Add Component” on
the right hand side and search for “metabody”. Click “MetaBody” when it
appears:
In the settings which appear now for our object, tick the following:
Grabbable and Move – This is what allows us to pick up and move our butterfly around the scene.
Arrow – This provides a directional arrow on the
Meta interface pointing at where the object is when it is not on screen.
This is really useful for objects which the user can move around the
scene – as people tend to drop objects and not see where they’ve gone!
The arrow saves a lot of time and confusion!
If we run the app now, we’d struggle to see the butterfly and might
be a tad confused (I know I was initially). This isn’t because we have
done anything wrong in the Meta SDK or in Unity. If you have been
following along step by step, you’ll be in the same situation — it is
due to a shader that is on our butterfly by default to make its wings
blend in nicely with the scene.
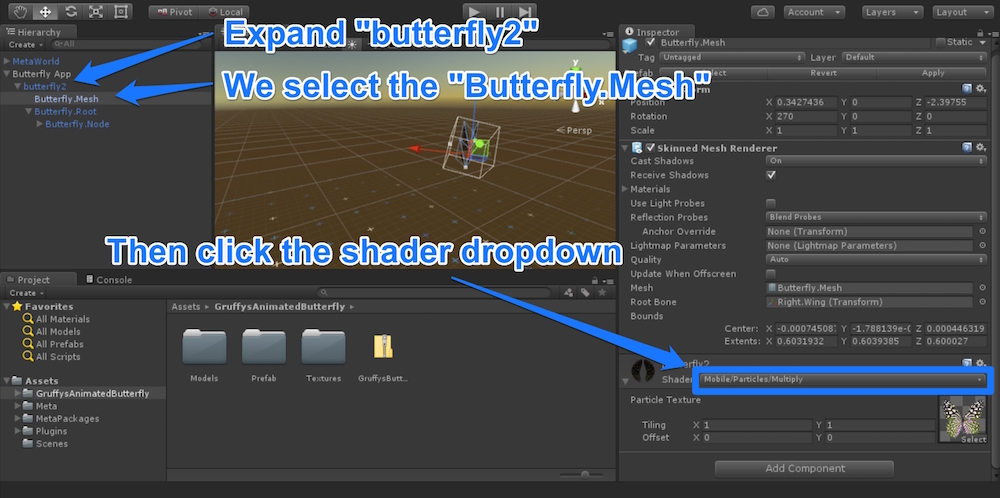
To make it visible for our Meta headset, we will want to change this
shader. To do so, click to expand the “butterfly2” game object in the
project hierarchy and select “Butterfly Mesh”. With this selected, click
the shader dropdown on the right:
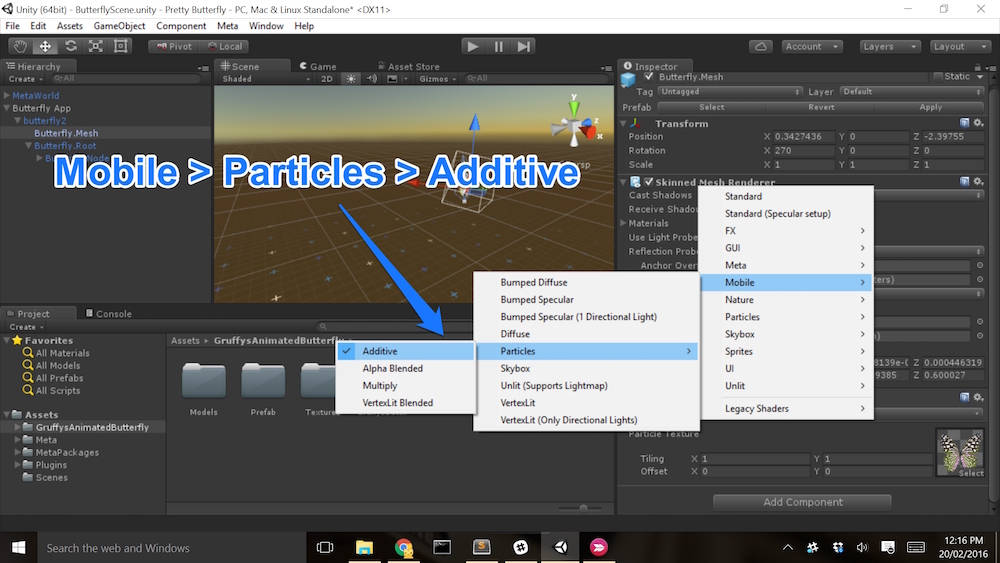
In the menu that appears, go to Mobile > Particles and
choose “Additive”. This gives us a different shader that makes our
butterfly object shine through our scene! Much nicer, it actually gives
it almost a hologram-style feel to it in augmented reality too.
In Action
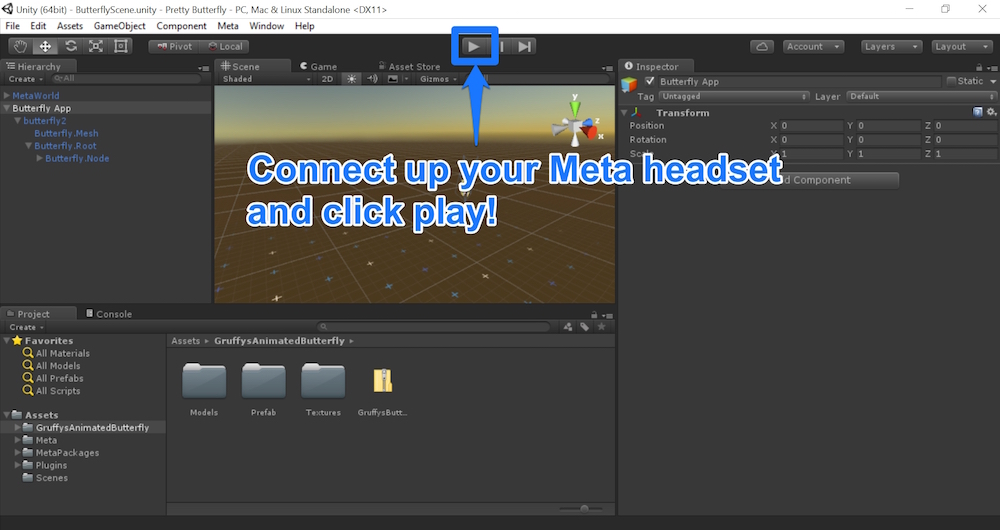
With that, we save our scene and are now ready to test it out!
Connect up your Meta headset and press the play button on the scene.
There are a few things that you might need to do if you aren’t seeing a butterfly as you’d hoped:
Not seeing your butterfly in front of you? You might need to recentre your view by clicking F4 — or follow the arrow!
Not seeing two images side by side in your headset? Make sure you’ve clicked the 3D button on the bottom left of your Meta developer kit control box.
Not seeing two images side by side in Unity’s preview? Press F2 to switch to side-by-side mode.
Seeing a very small image in your headset? Press F3 to switch to the rectified view.
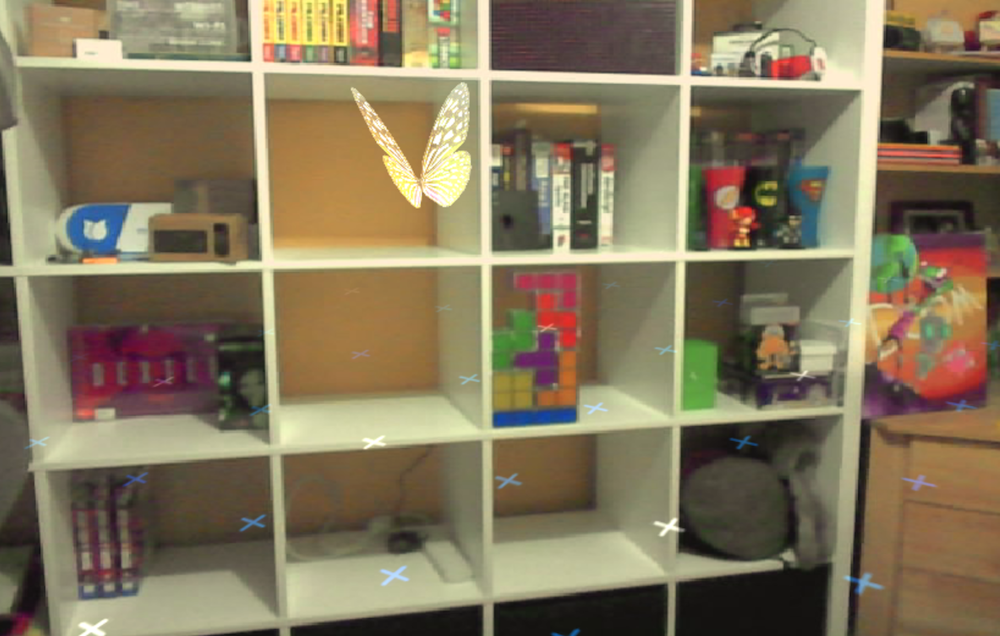
If you have got it displaying successfully, you should be able to see
a butterfly floating in your scene! You can grab it and move it around
with your own hand. Grabbing objects which don’t really exist in reality
is something which can take a bit of getting used to:
Make sure you have your open hand in front of the glasses until you see a dotted yellow circle.
Close your hand into a fist and that circle will go green.
Move your fist around to move the butterfly around the scene.
Open your fist again to let it free!
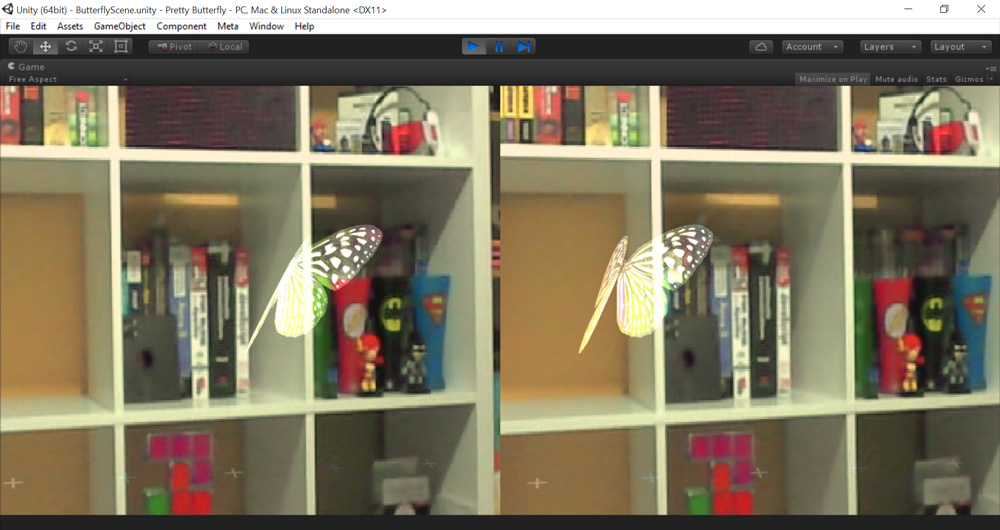
Here’s what my butterfly looks like in side by side view (this view looks 3D when viewed through the headset):
Here is a view of it with just one screen to show what someone wearing the headset will see:
Cara membuat Augmented Reality Gerak Pesawat Terbang
Pada pesawat terbang sistem gerak berasal dari gaya dorong(trust), gaya
tahan(drag), gaya
angkat(lift) dan berat pesawat(weigh). Gaya
dorong dihasilkan oleh mesin pesawat itu sendiri, serta gaya ini bekerja
berlawanan dengan gaya tahan(trust) yang disebabkan oleh tekanan aliran
udara dari depan pesawat, gaya angkat dihasilkan karena perbedaan
kecepatan aliran udara serta tekanan udara antara di atas dan di bawah sayap.
Kecepatan aliran udara di bawah sayap lebih rendah dari pada kecepata
aliran udara di atas sayap, akibatnya tekanan udara di bawah sayap lebih besar
dari pada tekanan udara di atas sayap yang menyebabkan pesawat dapat
terangkat ke atas. Gaya angkat bekerja berlawanan dengan berat pesawat.
Kombinasi gaya yang bekerja ini menyebabkan pesawat dapat terbang dengan baik.
Pada gambar dibawah ini menunjukkan gaya-gaya yang bekerja pada pesawat terbang
Nah guys sekarang kita belajar Augmented Reality pada
pembelajaran pesawat terbang dengan menggunakan Vuforia SDK dan Unity 3D J
Caranya..
1.Siapkan file gambar yang akan
dijadikan marker. disini saya menggunakan marker SEAMOLEC.
2.Masuk ke developer.vuforia.com lalu Register bagi yang belum mendaftar dan pilih Log in bagi yg sudah mendaftar.
3.Ikuti langkah-langkah membuat
database marker di Vuforia tersebut.
4.Save dalam bentuk Unity Package.
5.persiapkan file blender nya lalu buka
file.blend yang sudah terdapat Animasi nya buat file blender ini
6.pilih file - export - auto desk FBX tersebut pilih lagi
7. file - external data - unpack all into
files bila ada tanda centang pada automaticaly pack into .blend hilangkan dulu
tanda centangnya.
8. Dan masuk lagi pada file seperti
tadi pilih use file in curent directory bila sudah kita cek di
folder yang sudah kita siapkan tadi untuk melihat .fbx
9. Buka Unity 3D tarik ke areanya AR camera
dan image target.
10. Untuk main camera delete saja atur supaya
AR camera dan image target posisinya sama dengan cara position diganti
menjadi 0(nol).
Selanjutnya Pilih asset import packed custom package file yang dimasukan dari
unity package
12.Buat folder baru
tempat memasukkan file tekstur dan .fbx tadi. aturlah image target nya dengan data set
yang terdapat di empty nya dan kita ganti dengan unity package yang telah kita
masukan file .fbx dan tekstur dari blender tersebut.
Misal di
Asset>>Klik kanan>>New Folder>>Pesawat
13.Kita atur-atur saja di
Unity-nya. Memang memerlukan latihan tapi jangan menyerah yaa, Masukkan juga
Marker tadi yang dibuat di Vuforia. Jika berhasil maka tampilan akan seperti
ini:
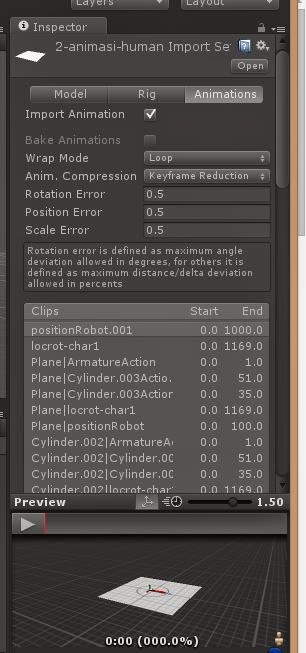
14.Untuk memasukkan animasi, klik file
pesawat.fbx>>>animation>>di tab rig pilih legacy kemudian
apply pindah ke animation wrap mode ganti dengan loop dan
ganti nama pada scene yang kita inginkan ya sesuai untuk star dan sesuaikan
yang ada pada file blender nya dan usahakan jangan sampai lupa mencentang
add loop frame dan pilih loop dan apply..
15. setelah itu masukan pada are kita dan atur saja mengunakan
scale dan posisi - posisi nya agar terlihat pada AR camera. disini saya juga
masih belajar jagan lupa untuk mengatur agar image target nya dapat terlihat ya
dengan centang AR camera pilih load data set.
16. nah setelah semua nya selesai tinggal play saja lalu lihat hasil
nya.. jangan lupa marker nya di hadapkan di kamera agar animasi dapat muncul.